
Knife Maintenance Month: Disassembly and Reassembly
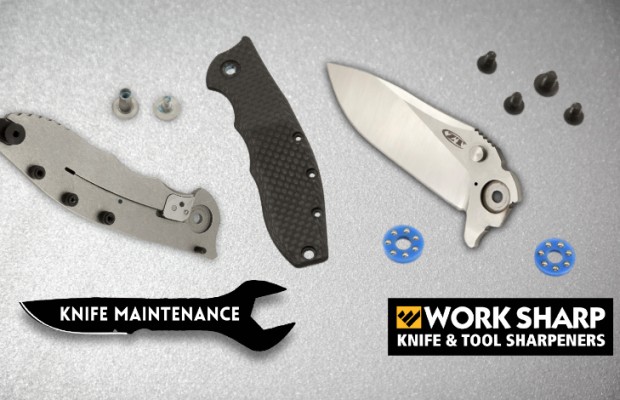
Brought to you by Work Sharp Knife & Tool Sharpeners
Properly maintaining your tools is crucial to their longevity and performance. Sometimes, that means you’ll need to take them apart. Whether it’s due to rust blooming under the liners or sand in the bearing pivot, this week’s installment in the Knife Maintenance Month series will help guide you through disassembling (and reassembling) your folding knives.
Shopping list of suggested supplies:
▢ High quality torx driver set
▢ A plastic bin (to catch parts)
▢ Non-permanent Threadlocker
▢ Smartphone (camera) and notepad
▢ Hairdryer or heat gun
An important reminder: Some manufacturers will void your warranty if you take your knife apart. This is something to consider if the idea of paying modest repair charges in the future is too hard to bear.
Most modern folding knives are held together with threaded fasteners that accept generic bits: Phillips, flat head, and torx, a six-lobed screw head designed to withstand more torque. You can find torx drivers at any good hardware store – we suggest investing in a quality set from a reputable brand. Tiny torx screws are easy to strip with a cheaply-made, misshapen driver. T6, T8, T9 and T10 are the most commonly used sizes. Be sure to always use the largest bit that fits in the screw head or you’re almost guaranteed to strip the screw.
Before you start disemboweling your knife, you’re going to want to determine if it can actually be taken apart. Traditional slipjoints and some modern folders like the Spyderco Manix 2 Lightweight, are fixed together permanently with pins. This doesn’t make them any less strong or well-built – you might even argue this makes them more durable over time – but it does mean they can’t be taken apart with just hand tools.
If you’re lucky, taking your knife apart will be no more complicated than undoing a few screws. Still, it’s a good idea to take photos and/or notes of the knife’s anatomy as you remove parts, especially when disassembling a knife for the first time. It could save you a lot of time and help you avoid the embarrassment of a ‘humpty-dumpty’ situation – not being able to put your knife back together again.
Expect parts to spring away and roll off of flat surfaces. Always work inside a small plastic bin and you’ll save yourself from losing small springs and screws and the time and stress it takes to hunt for them.
A common problem you may run into is a pivot screw that continues to spin without coming undone. You’ll need to anchor one side with another tool which is why it doesn’t hurt to have a spare set of torx bits on hand.
If a screw is stubborn, it may due to threadlocker, a sealant many manufacturers use to prevent loosening and rust. Heat it up with a hairdryer or heat gun to break the threadlocker’s hold and try again.
Whatever challenges you faced taking your knife apart are doubled when you try to put it back together. Some parts – stop pins, standoffs, and pivots – may be ‘keyed’ to fit together in just one orientation.
If you get stuck, your pictures and notes will help (if you took them), and take comfort in the fact that your knife only fits back together one way. Be patient and if you can’t figure it out take a break and try again later. If all else fails, you can always send the parts back to the manufacturer.
When fastening screws don’t tighten them all the way until all screws are in place. As a final step, apply a drop or two of Threadlocker to your pivot screw, but make sure to use a non-permanent formulation and apply just enough to cling between the threads.
Check back next week for Part 3 of our Knife Maintenance Month series – lubricating your knives.
You may also like...
-
Advertisement

-
-

Shop Talk: 7Forge Knives Goes from Science Project to Semi-Production
In the last five years, the knife making scene has absolutely exploded, with dozens upon dozens of new names, new talents, and new knives. One shop that gained a...

Grant Hawk Passes Away at 82
Hawk Knives delivered deeply sad news to the knife world yesterday: Grant Hawk, one of the most innovative, boundary-pushing knife makers of the 20th century, passed away earlier this...
-
Buck Sends Out Folder Fireworks with Flashy Flagship Variation
Summer is in full swing and Buck is tearing out of the gates with the immediate release of the July Buck of the Month. This month sees the company...
Production AUX MFG Pocket Rocket Lands Through Boker
Auxiliary Manufacturing continues full steam ahead, and is about to see its first production collaboration model through Boker. When it arrives with dealers, the Boker Plus Pocket Rocket will...

Rivery MFG Returns with Kitted Out Zero-G
Earlier this month we touched bases with Rivery Manufacturing, formerly Rivery CNC, a shop that changed its name to suit its growing ambitions and built on the continuing success...
Jerad Neeve Locks in with We Knife Co. Inmate
We Knife Co. is preparing to welcome yet another new collaborator this year with the soon-to-be-released Inmate model from Jerad Neeve. The Inmate unites large dimensions to a very...
Jack Wolf Embarks on Gateway Series with Budget-Friendly Barlow
Jack Wolf Knives is making its grand entry into the sub-$100 knife category with the appropriately named Gateway Barlow. This piece follows in the modern slipjoint footsteps of prior...


0 comments